TM 9-2520-272-34&P
4-19.
DISASSEMBLE RIGHT END COVER ASSEMBLY
(SHEET 2 OF 16)
WARNING
o Check slings and lifting devices for cuts, breaks, or wear before hoisting end cover assembly and
during hoisting. Slings and lifting devices can break and cause injury or death.
o Right end cover weighs approximately 125 pounds (57.1 kg). When lifting end cover, a hoist must be
used to avoid bodily injury.
TASK 1. REMOVE COOLER LINE ELBOW, CONNECTOR, AND RH OUTPUT FLANGE
COMMON TOOLS:
Bar, pry
Chisel, cold
Crowfoot, 1/2 inch square drive, 2 inches
Hammer, hand, ball peen
Handle, socket wrench, 1/2 inch square drive
Handle, socket wrench, 3/4 inch square drive
Socket, socket wrench, 1/2 inch square drive,
3/4 inch
Socket, socket wrench, 3/4 inch square drive, 1-
7/8 inches
Wrench, combination, 1-7/8 inches
Wrench, combination, 15/8 inches
SUPPLIES:
Bolt, 1/2-20 x 3 inch (2 required)
Rag, wiping (Item 15, Appendix C)
NOTE
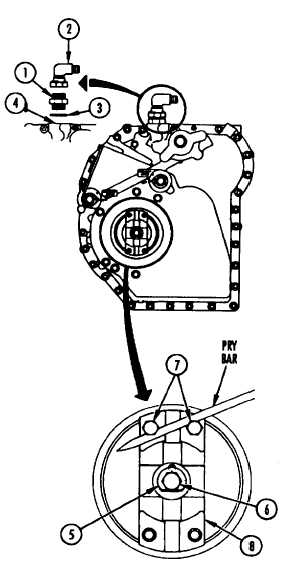
Right end cover assembly turned outside up.
1 Using 17/8 inch combination wrench to hold
connector (adapter) (1), use 2 inch crowfoot and
handle to remove elbow (2) from connector
(adapter) (1).
2 Using 1-7/8 inch socket and handle, remove
connector (adapter) (1) and packing (3) from
right end cover assembly (4). Remove o-ring (3)
from elbow (adapter) (1). Throw away o-ring.
3 Using chisel and hammer, straighten bent tab of
washer (5) Bend tab away from bolt (6).
4 Using 3/4 inch socket, install two 1/2-20 x 3 inch
bolts (7)
in tapped holes at either end of
output flange (8).
5 Using one hand, hold pry bar between two bolts
(7) to prevent flange (8) from turning.
Go to Sheet 3
Para 4-19, Task 1
Change 2 4-97
|
|