TM 9-2520-272-34&P
4-7. REMOVE RIGHT END COVER ASSEMBLY
(SHEET 7 OF 7)
Remove Reverse Equalizer Valve Components
18
19
20
21
22
23
24
25
26
27
WARNING
Spring-loaded parts can fly and injure you.
Always follow specified instructions
when removing bolts from covers that are attached to valve assemblies.
NOTE
Scavenge tube and oil transfer tube, extending into the bevel gear assembly,
cannot be removed until equalizer valve housing (19) has been removed.
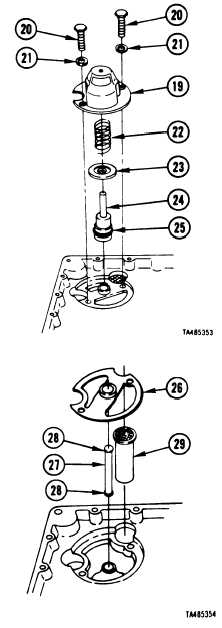
Use one hand to hold spring-loaded equalizer valve
housing (19) down when housing is being removed.
Using socket in other hand, remove two bolts (20) and
washers (21) holding equalizer valve housing (19) to
transmission. Carefully release housing, easing spring
pressure before lifting housing completely off.
Remove housing.
Remove spring (22).
Remove reverse equalizer valve (23).
Remove reverse equalizer piston assembly (24) with
seal ring (25).
Remove seal ring (25).
NOTE
Oil transfer tube (27) may remain in
transmission (bevel gear assembly), or it
may come out attached to under side of
diaphragm.
Remove equalizer valve diaphragm (26).
Remove equalizer valve oil transfer tube (27) with two
packings (28).
Remove packings (28).
Remove scavenge tube assembly (29).
FOLLOW-ON PROCEDURE: Install right end tubes and
loose components.
Refer to paragraph 4-16.
End of Task 2
4-26
Para. 4-7, Task 2
|
|