TM 9-2815-202-34
e. Test/Adjustment
(1) Connect high tension lead (28) to ignition
coil (40) and electrode (29).
(2) Connect air heater assembly (30) to
common ground.
WARNING
Do not touch ignition coil or
air heater assembly while
performing test. High voltage
is present. Personal injury
may result.
CAUTION
l
Do not apply voltage to ignition coil without a coil
air heater must be grounded.
to air heater connection. Coil and
(3)
l
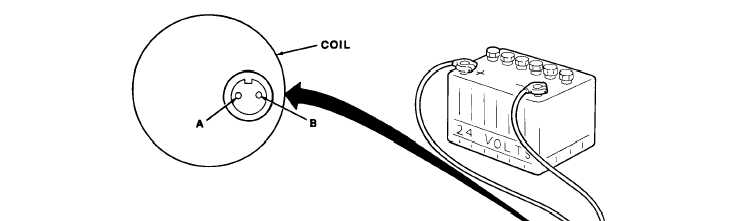
Apply positive lead to pin (A) and negative lead to pin (B) or damage to coil will
(4)
(5)
result.
Connect a 24 V dc power source to the coil input side of ignition coil (40). Observe electric
arc between electrode (29) and wire (39). Arc “may be steady or intermittent (about ten pulses
a second) with a popping noise.
Disconnect power source to coil (40) and remove lead (28).
Disconnect air heater assembly (30) from common ground.
f. Installation
(1) Insert ignition coil (40) into bracket (45). Secure with bolt (46), Iockwasher (48), and nut (47).
Torque bolt to 7-9Ib-ft(10-12 N-m).
(2) Position coil (40) and bracket (45) on air inlet housing. Secure with bolt (42), Iockwasher
(43), and flat washer (44). Torque bolt to 16-20 Ib-ft (22-27 N-m).
(3) Connect high tension lead (28) to ignition coil (40).
4-29
|
|