TM9-2815-202-34
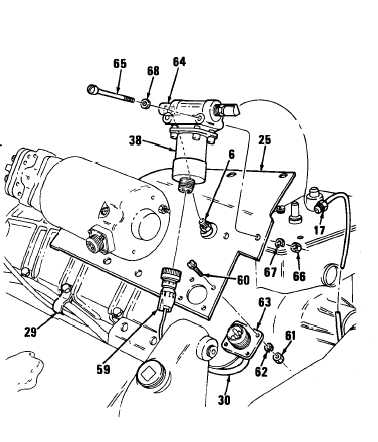
6-11. AIR BOX HEATER REPLACEMENT
SOLENOID VALVE
(Cont)
a.
b.
c.
d.
Removal
NOTE
Remove pump, motor, and bracket assembly before removing solenoid.
(1) Disconnect wiring harness terminal (59) from solenoid (38).
(2) Remove four screws (60), four nuts (61), and four Iockvvashers (62) securing wiring harness
connector (63) to bracket (25). Remove connector from bracket. Discard Iockwashers.
(3) Remove wiring harness (30). If necessary, remove clamp (29) from harness.
NOTE
Disconnect tube (17) during pump and motor assembly removal.
(4) Disconnect tube (6) from elbow (64) on solenoid (38). Remove tube.
(5) Remove two screws (65), two nuts (66), two Iockwashers (67), and two flat washers (68),
securing solenoid (38) to bracket (25). Remove solenoid.
Disassembly
(1) Remove elbow (64) from solenoid (38).
(2) Remove elbow (18) from bushing (69).
(3) Remove bushing (69) from solenoid (38).
Inspection
Inspect solenoid for cracks, damage, or
valve leakage.
Assembly
(1) Install bushing (69) into solenoid (38).
(2) Install elbow (18) into bushing (69).
(3) Install elbow (64) into solenoid (38).
e. Test/Adjustment
(1)
(2)
6-24
Attach 24 V dc power source to
solenoid (38) and listen to confirm
solenoid valve is opening and
closing. If no indication of movement,
replace solenoid valve.
Disconnect and remove 24 V dc
power source from solenoid (38).
|
|