ARMY TM 9-2815-256-24
AIR FORCE TO 38G1-96-2
MARINE CORPS TM 2815-24/5
h.
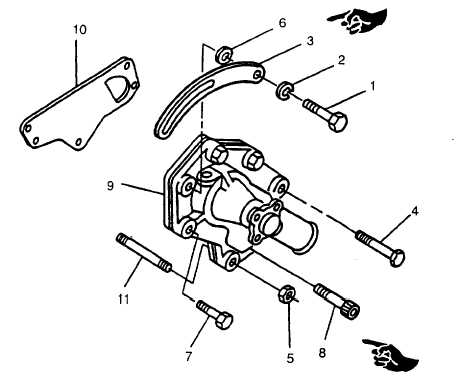
Remove capscrew (1, FIGURE 3-4), lockwasher (2), and washer (6) attaching alternator adjusting strap (3);
move strap out of the way. Discard lockwasher.
NOTE
Note location of shorter capscrew (7) for installation purposes.
i.
Remove capscrew (4), nut (5), and capscrew (7). Using an assistant to support water pump (9), turn socket head
screw (8) and remove water pump (9). Remove and discard gasket (10).
j.
Cover all openings to prevent entry of foreign material.
FIGURE 3-4. Water Pump Assembly
3-10.2. Inspection.
a.
Inspect pump rotation for abnormal noise, binding, or other abnormal conditions.
b.
Inspect pump housing and stud (1), FIGURE 3-4) for cracks, corrosion, or any other damage.
3-10.3. Replacement. Replace water pump if inspection reveals debris, cracks, or damage to pump housing and cover.
3-10.4. Installation.
a.
Remove all covers installed during removal procedure.
b.
Position new gasket (10, FIGURE 3-4) and water pump (9) on engine block and secure with socket head
capscrew (8), capscrews (7 and 4), and nut (5). Tighten fasteners to 35 ft-lbs (47 Nm).
Change 3
3-25
|
|