PAR 227, STEPS 1 5 - 18
A S S E M B L Y
C H A P 5, SEC X X X I I I
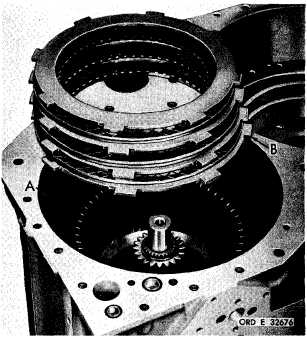
Figure 254 (Step 15)
I n s t a l l t h e i n t e r m e d i a t e - r a n g e c a r r i e r a nd
l o w - r a n g e r i n g g e a r a s s e m b l y ( A ) . T h i s a s-
s e m b l y w i l l h a v e t o e n g a g e a l l h i g h - r a n ge
clutch plates and intermediate-range ring gear
while being installed.
A s s e m b l y i s p r o p e r ly
installed when external splines of the assembly
touch, or nearly touch, the intermediate-range
p i s t o n.
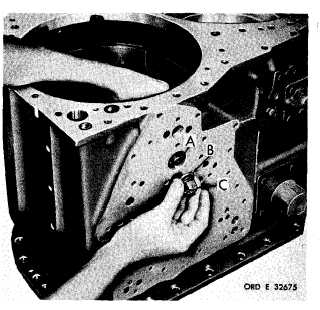
Figure 255 (Step 16)
R e m o v e i n t e r m e d i a t e - r a n g e p i s t o n h o u s i ng
3/8-16 x 1-3/4 bolt (A), lock washer (B) and
f l a t w a s h e r ( C ) . I n s t a l l l o w - r a n g e c l u t c h
a n c h o r ( D ) . U s i n g a p r y b a r ( E ) , d e p r e s s
a n c h o r ( D ) a n d i n s t a l l b o l t ( A ) , w a s h e r ( B )
and washer (C). Tighten the bolt (A) and then
l o o s e n s l i g h t l y .
N o t e . Place a piece of soft
metal between the end of bar (E) and the con-
tact surface of anchor (D).
Figure 256 (Step 17)
Install low-range clutch anchor bolt (A), wash-
e r ( B ) a n d 5 / 8 - 1 8 n u t ( C ) . T i g h t e n n u t o n ly
finger-tight at this time.
Figure 257 (Step 18)
I n s t a l l f o u r i n t e r n a l - ( A ) a n d f o u r e x t e r n a l-
splined (J) low-range clutch plates alternately,
beginning with an internal-splined plate (A).
1 6 7
|
|