TM 9-2520-272-34&P
4-20.
REPAIR RIGHT END COVER COMPONENTS
(SHEET 12 OF 14)
28
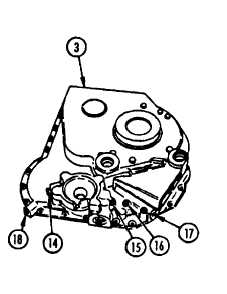
Turn end cover (3) over, outside up.
29
Using 11/16 inch socket, remove 3/8 inch pipe
plug (14).
30
Using 3/16 inch hex plug socket attachment,
remove three 1/8 inch pipe plugs (15, 16).
31
Using 1/4 inch hex plug socket attachment,
remove 1/4 inch pipe plug (17).
32
Using 5/16 inch hex plug socket attachment,
remove 3/8 inch pipe plug (18).
33
Check end cover bearing bore for damage.
Smooth out scratches with crocus cloth. If
grinding damage is present, replace end cover.
CAUTION
When using grinder, use care as to not
damage housing.
NOTE
Remove sleeve (19) only if necessary.
34
Using a grinder, cut two slots 180 degrees apart
in sleeve (19).
35
Using a chisel and hammer, break sleeve (19) at
slots. Throw away sleeve (19).
Assemble Right End Cover Assembly
36
Apply thread locking sealant to pipe plugs (14, 15, 16, 17, 18).
37
Using 5/16 inch hex plug socket attachment, install 3/8 inch pipe plug (18) in end cover (3).
38
Using torque wrench, tighten plug (18) to 12-16 lb ft (16-22 Nm).
39
Using 1/4 inch hex plug socket attachment, install 1/4 inch pipe plug (17).
40
Using torque wrench, tighten plug (17) to 96-120 lb in. (11-13 Nm).
41
Using 3/16 inch hex plug socket attachment, install pipe plugs (15, 16) in end cover (3).
42
Using torque wrench, tighten plugs (15, 16) to 50-60 lb in. (6-7 Nm).
43
Using 11/16 inch socket, install 3/8 inch pipe plugs (14) in end cover (3).
44
Using torque wrench, tighten plug (14) to 12-16 lb ft (16-22 Nm).
Go to Sheet 13
Para. 4-20, Task 5
Change 2 4-123
|
|


