TM 9-2520-272-34&P
4-30.
ASSEMBLE
CENTER
HOUSING
(SHEET 17 OF 21)
TASK 7. INSTALL LEFT BRAKE ASSEMBLY
COMMON TOOLS:
Adapter, 1/2 to 3/8 inch square drive
Extension, socket wrench, 1/2 inch square drive, 6 inch
Gage, feeler
Hammer, hand, plastic faced
Pliers, retaining ring, external
Screwdriver, large flat tip
Socket, socket wrench, 1/2 inch square drive, 9/16 inch
Socket, socket wrench, 1/2 inch square drive, 7/16 inch
Socket, socket wrench 1/2 inch square drive, 1/2 inch
Socket, socket wrench, 1/2 inch square drive, 5/8 inch
Wrench, torque, 0-175 ft-lb
Wrench, torque, 0600 in-lb
brake cam) (73342) 23046647
REPAIR PARTS:
Packing, preformed (left
Packing, preformed (left brake cam) (73342) 23046648
Seal, lip-type (left brake cam) (73342) 6836128
Seal, lip-type (left brake cam) (73342) 6836127
SPECIAL TOOLS:
Socket, socket wrench (19207) 8355955
SUPPLIES:
Band, rubber (2 required) (Item 1, Appendix C)
Lubricating Oil (Item IQ Appendix C)
1
2
3
4
Petrolatum (Item 14, Appendix C)
Rag, wiping (Item 15, Appendix C)
Wooden Blocks, 4 x 4 x 16 inches (2 required) (Item 3, Appendix C)
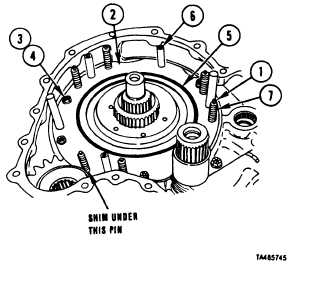
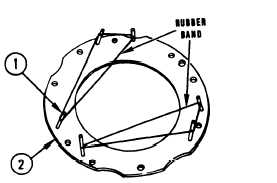
Install six headless straight pins (1) in brake backing
plate (2). Wrap with rubber bands to hold pins (1) in
p l a ce
Install brake backing plate (2), along with pins (1).
Remove rubber bands Place feeler gage blade under
one pin (1) to hold it upward until assembly is
complete.
Using 9/16 inch socket and extension, install five
washers (3) and bolts (4) that retain backing plate (2).
Using torque wrench, tighten five bolts (4) to 36-43
lb-ft (49-68 N•m).
Install brake coolant seal (5).
5
Go to Sheet 18
4-238
Para. 4-30, Task 7
|
|


