TM 9-2815-250-24&P
3-5.
CYLINDER HEADS REPAIR (continued).
4.
Inspect valves and valve seats for cracks, burns, or bends. Replace any cracked, burned, or bent valves. If valve
seats are cracked or burned, replace cylinder head.
c.
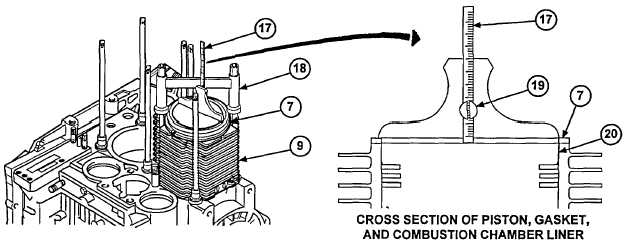
ADJUSTMENT
CAUTION
If, after removing the cylinder head, you have replaced the combustion chamber
liner, piston, connecting rod, or crankshaft, the valve-to-piston clearance must be
checked.
Too little clearance will result in damage to pistons, cylinder heads, and valves.
Too much clearance will cause the engine to lose power and be difficult to start.
NOTE
·
There are two pistons on the engine. Follow steps 1 through 4 to adjust the
valve-to-piston clearance on each of them.
·
Gaskets come in various thicknesses. It may be necessary to try several
different gaskets to achieve the desired valve-to-piston clearance. Use only
one gasket on each combustion chamber liner.
1.
Install new gasket (7), with a thickness of 0.60 mm, and cylinder alignment bracket (18) on combustion chamber
liner (9).
NOTE
Make sure piston is as high as possible in the combustion chamber.
2.
Place bottom of depth gage rule (17) across piston (20) and gasket (7). Loosen screw (19) and slide depth gage
rule (17) down to crown of piston (20). Be sure to measure highest part of piston (20). Tighten screw (19) and
read measurement. Clearance should be no less than 0.024 inch (0.61 mm) and no greater than 0.026 inch (0.66
mm).
3.
If clearance is incorrect, repeat steps 1 and 2 using a gasket with a different thickness.
4.
When clearance is correct, remove cylinder alignment bracket (18) from combustion chamber liner (9), leaving
gasket (7) in place.
3-17
|
|