ARMY TM 9-2815-256-24
AIR FORCE TO 38G1-96-2
MARINE CORPS TM 2815-24/5
(1)
Inspect all cylinder head passages for restrictions. Heads with restricted or clogged passages can be
cleaned by soaking them in tank of hot caustic solution.
(2)
Scrape all old gasket material from head. Use a powered wire brush to clean sealing surfaces.
(3)
If cylinder head is not put in a chemical hot tank for cleaning, clean with solvent and a brush. Dry with
compressed air and be sure to blow out all passages.
g.
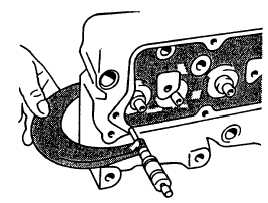
Clean injection nozzle bores as follows:
CAUTION
To keep cleaning tool from getting dull, always turn tool clockwise through bore, even when pulling
back.
(1)
Clean carbon deposits from nozzle bores with nozzle bore cleaning tool.
(2)
Blow debris from bore with compressed air.
h.
Check cylinder head flatness as follows:
(1)
Check cylinder head for flatness using precision straightedge and feeler gage. Check lengthwise and
crosswise in several places. A good secondary check is one that is on a diagonal.
(2)
The out-of-flat measurement must not exceed 0.005 inch (0.13 mm) for the entire length or width of head,
or 0.001 inch (0.025 mm) for every 5.90 inches (150 mm) of length or width of head.
(3)
If any measurement exceeds this specification, the cylinder head must be either reconditioned or replaced.
Refer to step i and measure cylinder head thickness.
i.
Measure cylinder head thickness (FIGURE 3-121) as follows:
(1)
If cylinder head thickness is less than minimum allowable thickness of 4.104 inches (104.24 mm), do not
resurface it. Install a new cylinder head.
FIGURE 3-121. Measuring Cylinder Head Thickness
(2)
If necessary to resurface cylinder head, the cylinder head thickness can be no less than 4.104 inches
(104.24 mm). Remove only what is necessary to restore flatness.
(3)
After resurfacing, check for flatness as described in step h and check surface finish on combustion face of
head.
(4)
Measure and record valve recess dimension for all valves, refer to paragraph 3-34.2.
3-151
|
|


