TM 9-2920-243-34
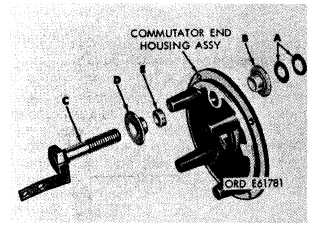
c, Remove two guard washers (A, fig. 3-23) and
insulating bushing (B) from jumper screw (C).
Slide jumper screw out of commutator end
housing and then remove insulating bushing (D)
and sealing ring (E).
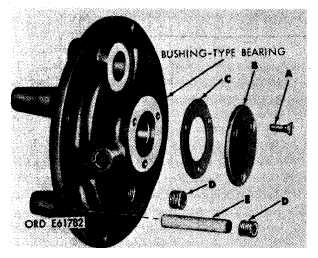
d. Remove three flat head screws (A, fig. 3-24)
cover plate (B), and plate gasket (C). Discard
gasket. Remove two hex-socket head plugs (D)
and oil wick (E).
NOTE
Do not attempt to remove bushing-type
bearing unless inspection (para 3-14 h)
indicates need for replacement.
Figure 3-23. Removing or installing brush rigging jumper
screw and attaching parts.
Figure 3-24. Disassembling or assembly commutator end
housing assembly.
3-13. Cleaning
WARNING
Particles blown by compressed air are
hazardous. Make certain air stream is
directed away from user and any other
persons in area.
a. General. Wash all parts, except those
detailed in 3-13 b through 3-13f below, in dry-
cleaning solvent, Type II (SD-2), Specification P-
D-680, and dry with compressed air.
b. Field Coils. Clean field coils and field ring
thoroughly with a cloth dampened with dry-
cleaning solvent. Be careful not to damage
protective insulation coating. Dry thoroughly
with compressed air (15 psi max.).
c. Armature. Remove loose particles from
armature and wipe with a clean cloth dampened
with dry-cleaning solvent. Clean commutator
lightly with 00 sandpaper and remove all dust
with compressed air.
d. Brushes. Clean brushes with a clean, dry
cloth only. Extreme care must be taken to
prevent dry-cleaning solvent from contacting
brushes.
e. Relay Coil and Shell Assembly. Only ex-
ternal metal surfaces of relay coil and shell
assembly can be cleaned. Clean with a cloth
dampened in dry-cleaning solvent.
f. Non-Metallic Components. Do not clean such
parts as sealing rings, insulating bushings, and
insulating washers. Wipe with a clean, dry cloth.
3-14. Inspection
a. General. Inspect all screws, bolts, nuts,
threaded holes, and plugs for worn or damaged
threads. Replace all worn or damaged parts.
Inspect remaining hardware items and replace
damaged parts.
b. Pinion Housing.
(1) Inspect pinion housing for cracks,
distortion, and burs. Replace if damaged.
(2) Inspect housing bushing-type bearing for
score marks and wear patterns. Check bearing
against limits specified in repair and rebuild
standards (para 3-31 d) and replace (para 3-15 b ),
if worn beyond limits.
(3) If housing bushing-type bearing is
removed (para 3-15 b ), check diameter of bearing
bore in pinion housing against limits specified in
repair and rebuild standards (para 3-31d).
Replace housing if worn beyond limits.
3-9
|
|