*C2
*C2
*C2
PAR 1 9 5 - 1 96
I N T E R M E D I A T E P L A N E T A R Y , L O W R I N G G E A R R E B U I L D
CHAP 5, SEC X X V I
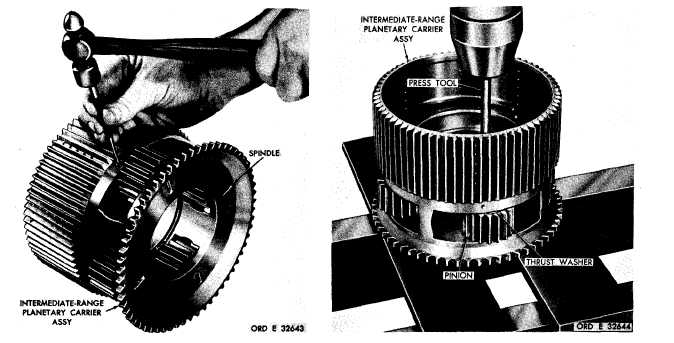
Figure 224. Removing spindle lock pin
and repair recommendations. Repair and re-
b u i l d p o i n t s o f m e a s u r e m e n t f o r f i t s , c l e a r-
ances and wear limits are indicated by small,
l o w e r c a s e l e t t e r s i n f i g . 3 7 6 , f o l d - o u t 5 .
Refer to par. 239 for wear limits information.
1 9 6 . A S S E M B L Y ( f i g . 3 7 6 , f o l d - o u t 5)
N o t e . C h i l l s p i n d l e s 1 9 i n d r y i ce
for approximately one hour, prior to
installation.
a .
P l a c e i n t e r m e d i a t e - r a n g e p l a n e t a ry
carrier,
long-splined
end
down,
in
a
press
(fig. 226).
b . Grease the inside diameter of plane-
t a r y c a r r i e r p i n i o n 2 2 , f i g . 3 7 6 , f o l d - o u t 5.
c . I n s e r t 2 2 s p i n d l e r o l l e r s 2 3 i n t o t he
pinion bore. Refer to fig. 215.
e . Insert alining tool 8351208 through the
p i n i o n .
Figure 225. Removing intermediate-range planetary
carrier spindle
Figure 226. Installing intermediate-range planetary
carrier spindle
1 5 3
|
|