TM 5-3895-360-13
7-1. CARBURETOR
REPLACEMENT 7-2. CARBURETOR ADJUSTMENT.
(Con’t).
INSTALLATION
NOTE
a.
b.
c.
d.
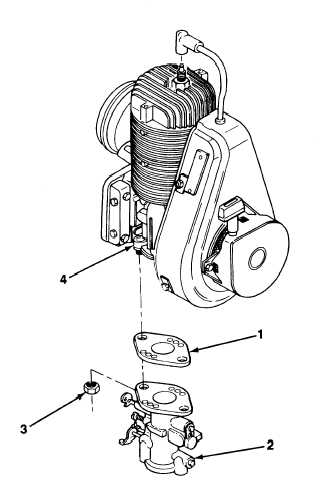
Refer to Figure 7-1, Carburetor Replacement,
for step a.
Install new gasket (1) and carburetor (2) on reed
plate (4) with two nuts (3).
Connect throttle control to carburetor (see para-
graph 7-7).
Connect fuel line to carburetor (see paragraph 7-6).
Install air cleaner (see paragraph 7-3 or 7-4).
TOOLS:
General mechanic’s tool kit . . . . . . . SC 5180-90-N26
ADJUSTMENT
CAUTION
Use care when turning adjustment screws.
Failure to follow this caution may result In dam-
age to needle and seats.
NOTE
Refer to Figure 7-2, Carburetor Adjustment,
for steps a through f.
Correct carburetor adjustment Is Important.
Adjustments may be necessary as operating
conditions change. In warm weather, set car-
buretor 1/8 turn leaner, or counterclockwise.
In cold weather, set carburetor 1/8 turn richer,
or clockwlse.
a. Turn high speed adjustment screw (2), idle mixture
adjustment screw (3), and idle stop adjustment
screw (4) clockwise until fully closed.
b. Turn high speed adjustment screw (2) and idle mix-
ture adjustment screw (3) one turn counterclock-
wise.
c. Start tamper (see paragraph 2-4) and allow engine to
warm.
d, Accelerate and decelerate engine using throttle le-
ver (1). If engine falters or accelerates slowly, turn
idle mixture adjustment screw (3) counterclockwise
until performance is improved.
Figure 7-1. Carburetor Replacement.
7-2
|
|


