*C2
PAR 137-141
T O R Q U E C O N V E R T E R H O U S I N G R E B U I LD
C H A P 5, SEC X V
S e c t i o n X V . T O R Q U E C O N V E R T E R H O U S I N G — R E B U I L D
1 3 7 . D E S C R I P T I ON
Refer to par. 9 for the description of the
torque converter housing.
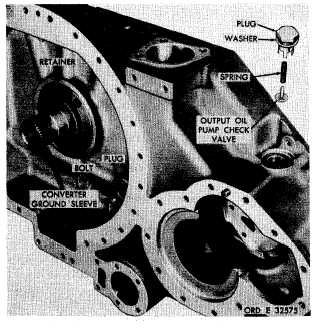
1 3 8 . D I S A S S E M B L Y ( f i g . 3 7 4 , f o l d - o u t 3 )
a . U s i n g a 1 - l / 2 - i n c h w r e n c h , r e m o ve
o u t p u t o i l p u m p c h e c k v a l v e p l u g , w a s h e r,
valve and spring (fig. 156).
b . U s i n g a 9 / 1 6 - i n c h w r e n c h , r e m o v e
five self-locking bolts retaining seal ring re-
t a i n e r ( f i g . 1 5 6 ) . R e m o v e t h e r e t a i n e r.
c . D o n o t r e m o v e t h e t o r q u e c o n v e r t er
g r o u n d s l e e v e u n l e s s r e p l a c e m e n t i s n e c e s-
sary (fig. 156). If necessary, press the sleeve
from the housing toward the front side.
d . R e m o v e a n y p l u g s i n t h e h o u s i n g if
necessary to aid in the cleaning of oil passages.
N o t e . I f n e c e s s a r y t o r e m o v e i n s e r ts
or dowels, refer to par. 72 for inspec-
tion and repair recommendations.
1 3 9 . C L E A N I NG
Refer to par. 71 for cleaning recommen-
d a t i o n s.
1 4 0 . I N S P E C T I O N A N D R E P A IR
R e f e r t o p a r . 7 2 f o r g e n e r a l i n s p e c t i on
a n d r e p a i r r e c o m m e n d a t i o n s . R e p a i r a n d r e -
b u i l d p o i n t s o f m e a s u r e m e n t f o r f i t s , c l e a r -
ances and wear limits are indicated by small,
lower
case
letters
in
fig.
374,
fold-out
3.
Refer to par. 237 for wear limits information.
Figure 156. Torque converter housing and related parts
1 4 1 . A S S E M B L Y ( f i g . 3 7 4 , f o l d - o u t 3)
a. Install any plugs in housing which were
removed to aid in the cleaning of the torque
converter housing (fig. 156).
b . I f t h e c o n v e r t e r g r o u n d s l e e v e w as
r e m o v e d , i n s t a l l a n e w r e p l a c e m e n t g r o u n d
s l e e v e ( f i g . 1 5 6 ) . P r e s s s l e e v e i n t o h o u s i ng
until firmly seated, being sure that the bolt
holes in the housing and sleeve are properly
indexed.
c . Install the seal ring retainer and secure
with five 3/8-16 self-locking bolts (fig. 156).
Torque the bolts to 36-43 pound-feet.
d . Install output oil pump valve, spring,
washer and plug (fig. 156).
1
21
|
|