TM 9-2520-272-34&P
4-24. ASSEMBLE LEFT END COVER ASSEMBLY
(SHEET 4 OF 5)
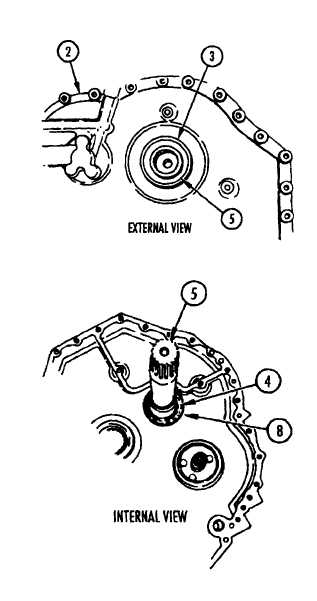
11
Carefully rotate shaft (5) and push end of shaft
through seal.
12
Keeping shaft very straight, use plastic faced
hammer on splined end of shaft (5) to seat
bearing (4) in shoulder on end cover (2). If
necessary, heat end cover with heat gun around
bearing journal if bearing does not easily seat.
13
Check that seal (3) remains in position in end
cover (2) and that lip on seal is not distorted
when shaft (5) passes through seal.
NOTE
When output shaft and bearing are
seated,
snapring
groove
will
be
accessible in sleeve at outer edge of
bearing.
14
Using screwdriver, install snapring (8) in groove
in sleeve above bearing (4).
15
Apply lubricating oil to bearing (4).
16
On X200-4A install new preformed packing (9)
on end of shaft (5).
17
Coat new packing with petrolatum.
End of Task 2
TASK 3. INSTALL LH OUTPUT FLANGE
COMMON TOOLS:
Bar, pry
Hammer, hand, machinist’s
Handle, socket wrench, 1/2 inch square drive
Punch, center, tapered point
Socket, socket wrench, 1/2 inch square drive,
3/4 inch
Wrench, torque, 0-175 ft-lb
REPAIR PARTS:
Washer, tab type (73342) 6752556
SUPPLIES:
Bolt, 1/2-20 x 3 inch (2 required)
Rag, wiping (Item 15, Appendix C)
Wooden Blocks, 2 x 4 inches x 16 inches long (2
required)
(Item 2, Appendix C)
Go to Sheet 5
4-158 Change 2
Para. 4-24, Task 2
|
|