TM 9-2520-272-34&P
4-8. REMOVE LEFT END COVER ASSEMBLY
(SHEET 2 OF 10)
8.
a 3/8 socket and handle to remove the nut (10)
that retains the clamp (3) to the bracket
(7).
9.
Remove bolt (9) washer (4), nut (10) and clamp
(3) from bracket.
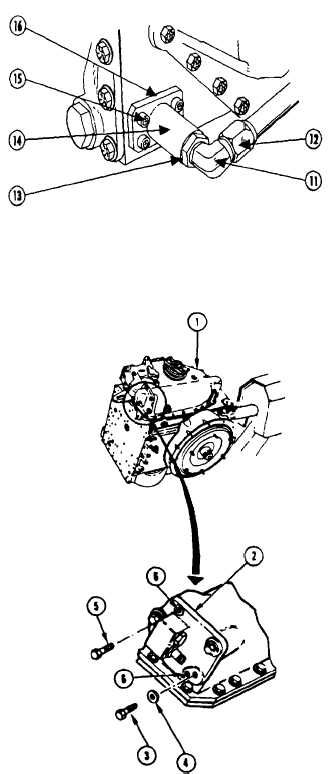
10.
Using a 1-1/4 wrench remove the elbow (11)
and o-ring
(13)
from the adapter.
11.
Remove o-ring (13)
from elbow (11) and
throw away o-ring (13).
12.
Remove adapter (14)
from
LH
End
Cover
Assembly (8). 13 Using a 1/4 socket, socket
(Allen), extension and handle remove 4 bolts
(15) that retain the adapter (14) and gasket (16)
to the LH End Cover Assembly (8).
14.
Remove gasket (16) and throw away gasket
(16).
15.
Inspect parts for damage and replace as
necessary.
FOLLOW-ON PROCEDURE: Install Oil Level Tube
Assembly. Refer to paragraph 4-15.
End of Task 1
TASK 2. REMOVE OIL FILTER HEAD ASSEMBLY
COMMON TOOLS:
Extension, socket wrench, 1/2 inch square drive, 10
inch
Handle, socket wrench, 1/2 inch square drive
Socket, socket wrench, 1/2 inch square drive, 9/16
inch
SUPPLIES:
Bolt, 3/8-16 x 1-1/4 inch (2 required)
Rag, wiping (Item 15, Appendix C)
1.
Using rotary control handle on maintenance
stand, rotate transmission so that left end cover
assembly (1) is up.
2.
Using wiping rag, clean oil filter head (2).
3.
Using socket, remove three bolts (3) and
washers (4) from filter head (2).
4.
Using socket, install two 3/8-16 x 1-1/4 inch bolts
(5) from filter head (2).
Go to Sheet 3
Para 4-8, Task 2
Change 2 4-28
|
|


