TM 9--2815--247--34
0082 00--2
OIL PUMP ASSEMBLY REPAIR -- CONTINUED
0082 00
Disassembly
WARNING
NOTE
If cap is hard to remove, temporarily install oil pump back
on engine with mounting screws to hold oil pump while
removing cap.
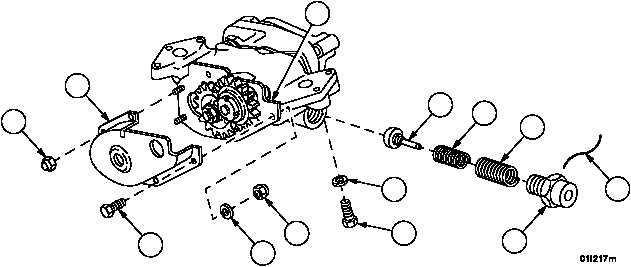
1. Cut lockwire (1) and remove cap (2). Discard lockwire.
2. Separate valve (3), spring (4), and spring (5) from cap (2).
NOTE
Screw and flat washer are used in mounting oil pump to
crankcase.
3. Remove screw (6) and flat washer (7).
CAUTION
Do not use prying tool to separate any housings. Hous-
ings all have machined surfaces. Damage may occur by
prying pieces apart.
4. Remove two self--locking nuts (8) attaching access cover (9) to pump. Discard self--locking nuts.
5. Remove three self--locking nuts (10), three flat washers (11), and three screws (12) attaching access cover (9) to
plate (13). Discard self--locking nuts.
Figure 19
1
2
3
4
5
13
9
8
12
11
10
7
6
|
|