TM 9-2815-250-24&P
3-6.
CRANKCASE REPAIR (continued).
8.
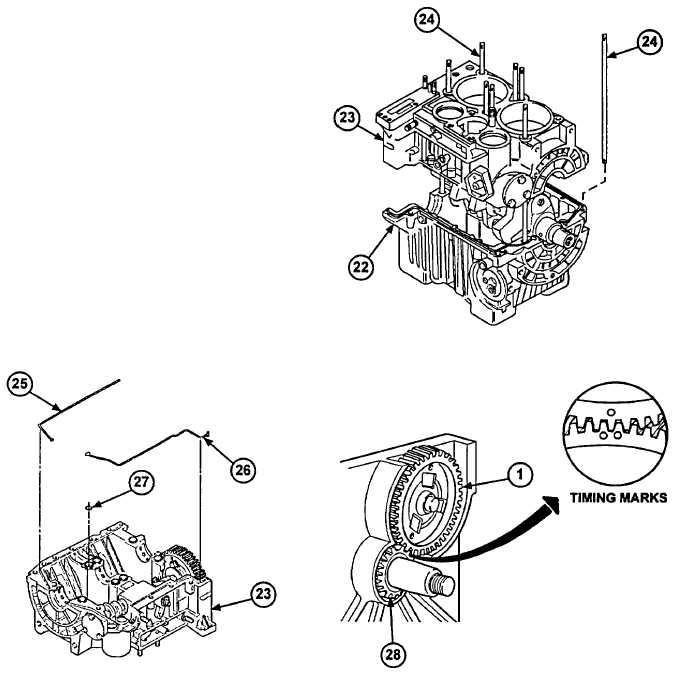
Remove upper crankcase (23) from eight studs (24) on lower crankcase (22). Set upper crankcase (23) top down
on work surface.
9.
Inspect eight studs (24) and remove any bent or
damaged studs from lower crankcase (22).
Discard removed studs.
10.
Remove two gaskets (25 and 26) from upper
crankcase (23). Discard gaskets.
11.
Remove eight O-rings (27) from eight grooves in
upper crankcase (23). Discard O-rings.
b.
ASSEMBLY
1.
Apply grease to eight new 0-rings (27). Install
eight O-rings (27) on eight grooves in upper
crankcase (23).
2.
Apply sealing compound to ends of two new
gaskets (25 and 26). Lightly coat the rest of
each gasket (25 and 26) with lubricating oil.
Install two gaskets (25 and 26) on upper
crankcase (23).
3.
Install eight new studs (24), if removed.
CAUTION
During installation of upper crankcase, rotate crank gear so timing mark on crank
gear is between two timing marks on camshaft gear. Failure to align timing marks
correctly may cause damage to the engine.
4.
With the aid of an assistant, install upper crankcase (23) on eight studs (24) and lower crankcase (22). Make
sure timing marks on crankshaft gear (28) and camshaft gear (1) are aligned and that two gaskets (25 and 26)
and eight O-rings (27) stay in place.
3-22
|
|