TM 9-2815-250-24&P
3-12. FILLER NECK REPLACEMENT.
This Task Covers:
a.
Removal
b. Installation
Initial Setup:
Tools/Test Equipment:
Crankcase gasket set (Item 1, Appendix F)
General mechanic's tool kit, automotive
(Item 15, Appendix G)
Equipment Conditions:
Filler cap removed (para 2-18).
Materials/Parts:
Airflow deflectors removed as needed to allow
Grease, automotive (Item 5, Appendix D)
access to oil filler assembly (para 2-24).
Sealing compound (Item 11, Appendix D)
a.
REMOVAL
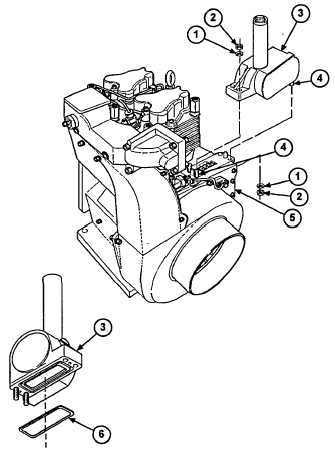
1.
Remove four nuts (2) and washers (1) from four
studs (4).
2.
Remove filler neck (3) from crankcase (5).
3.
Remove O-ring (6) from groove of filler neck (3).
Discard O-ring.
b.
INSTALLATION
1.
Lightly coat new O-ring (6) with grease. Install O-
ring (6) in groove in filler neck (3).
2.
Apply sealing compound to four studs (4).
3.
Install filler neck (3) on crankcase (5).
4.
Install four washers (1) and nuts (2) on four studs
(4).
FOLLOW-ON TASKS:
Install airflow deflectors
(para 2-24).
Install filler cap (para 2-18).
3-46
|
|