ARMY TM 9281,252-24
AIR FORCE TO 38G1-92-2
c.
Remove fuel injector pipe between pump (5, FIGURE 3-7) and fuel injector, refer to paragraph 3-18.
d.
Remove fuel supply lines, refer to paragraph 3-15.
e.
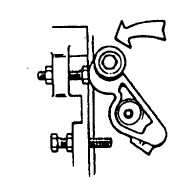
Remove nut (1) and damp (2) securing fuel injection pump (5)
NOTE
Care must be taken to avoid dropping items into crankcase.
f.
Lift fuel injection pump (5) out of crankcase and remove shim pack (6). Tag them as to which cylinder they
came from.
g.
If necessary, remove thrust cup (8), and tappet (7) from crankcase using magnetic pick-up. Tag them as to
which cylinder they came from.
h.
If damaged, remove stud (3).
I.
Cap/cover all openings.
3-13.2. Inspection.
a.
Inspect pump housing for cracks, corrosion, or any other damage.
b.
Inspect shim pack for corrosion or damage.
c.
Inspect tappet for cracks, corrosion, or any other damage.
3-13.3. Test
NOTE
This test must be performed with engine installed in end item.
a
Disconnect fuel injector pipe from top of pump to be tested.
b.
Connect a fuel pressure gage capable of displaying 3000 psi (20,685 kPa)
c.
Using end item controls, crank engine and observe pressure gage.
d.
Pressure gage should read approximately 3000 psi (20,685 kPa). If reading is not as specified, replace fuel
pump.
e.
Remove pressure gage and connect fuel injector pipe. Tighten coupling nut to 21.0 ft-lbs (28.5 Nm).
3-13.4. Installation.
a.
Remove all caps/covers installed during removal.
b.
Before installing fuel injection pump, ensure governor is correctly adjusted, refer to paragraph 3-23.5.
Change 2 3-23
|
|