TM 9-2815-202-34
(j)
(k)
(1)
(m)
(n)
(o)
(P)
(q)
Install oil filler cap or tape opening.
Tape air inlet and exhaust openings closed.
Fill the crankcase with oil to a point approximately 15 inches below the top of the oil
gage rod tube. (Used oil can be used for this purpose).
Manually turn engine over at least one complete revolution.
Remove oil pan drain plug and drain oil.
Reinstall oil pan drain plug.
Install the oil gage rod (if missing, tape the tube opening closed).
Apply a light coat of grease to front and rear exposed portions of the crankshaft and any
other exposed machined surface.
c. Installation
NOTE
• Do not forward an unserviceable engine missing components or down parts.
• For models 7083-7391 and 7083-7396, if installed, crankshaft damper must be
removed from engine and secured in container prior to engine installation in
container (Refer to Para 5-27 for damper removal). Crankshaft damper must be
protected and secured on shelf in container during shipment.
(1)
(2)
l
l
(3)
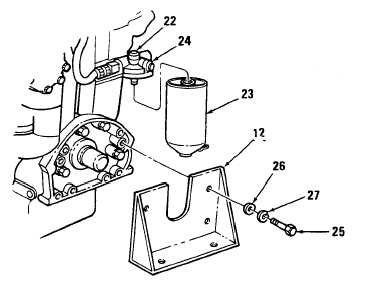
Remove four bolts (25) securing front cover to engine.
container.
Attach U-shaped bracket (12), to front of engine using
Store bolts in cloth mailbag in
four (1/2-13x4) bolts (25) (located in
mailbag in engine container), four flat washers (26), and four Iockwashers (27).
NOTE
Only model 7083-7395 will
require installation of fuel strainer
after front U-shaped bracket has
been installed.
Allow brackets to fit loosely so
adjustment is possible.
Secure fuel strainer shell assembly (23) to
adapter (24) with bolt (22). Tighten bolt.
C h a n g e 1
3-13
|
|