TM 5-3895-360-13
13-3. LOWER UNIT MAINTENANCE (VR11C) (Con’t).
NOTE
c. Remove four screws (6) from guide tube (8) and
gearcase (3).
Refer to Figure 13-3, Draining and Filling Low-
er Unit oil (V11C), for steps e and f.
d. Push down on guide tube (8) and remove two solid
disks (5) and rod pin (7) from piston rod (9).
e. Fill lower unit (1) with lubricating oil (Item 13, Appen-
dix E).
e. Remove lower unit (1) and preformed packing (4)
from gearcase (3). Discard preformed packing,
f. Install oil sight indicator (2) in lower unit (1).
g. Install tamper shoe (see paragraph 13-1).
13-4. LOWER UNIT MAINTENANCE
(VR11).
TOOLS:
General mechanic’s tool kit . . . . . . . SC 5180-90-N26
Mechanical puller kit . . . . . . . . . . . SC 4910-95-CL-A31
Machine bolt (2) . . . . . . . . . . . . . . TM 5-3895-360-24P
REMOVAL
a. Remove tamper shoe (see paragraph 13-1).
NOTE
Refer to Figure 13-9, Draining and FIlling
Lower Unit Oil (VR11), for step b.
A suitable container should be used to catch
any draining oil. Ensure that all spills are
properly cleaned.
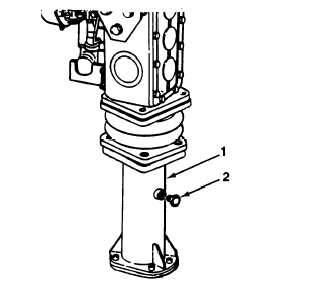
b. Remove oil sight gage (2) from lower unit (1) and al-
low all oil to drain.
NOTE
DISASSEMBLY
Refer to Figure 13-11, Lower Unit Disassembly
Bolts installation and Removal (VR11), for
steps a and b.
a. Remove two screws (11) from base plate (12).
b. Install two machine bolts (1 O) on base plate (1 2).
Figure 13-9. Draining and Filling
Lower Unit Oil (VR11).
Refer to Figure 13-10, Lower Unit Replacement
(VR11), for steps c through e.
13-8
|
|