TM 9-2520-272-34&P
4-20.
REPAIR RIGHT END COVER COMPONENTS
(SHEET 7 OF 14)
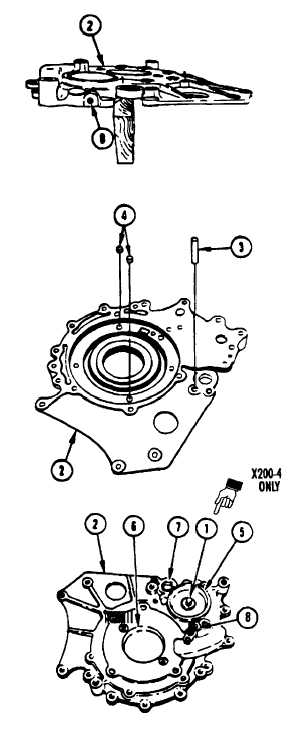
14 Turn support (2) over, outside up, and prop
support with wooden block placed near pipe plug
(8).
15 Using 3/16 inch hex plug end and socket handle,
remove pipe plug (8) from support (2).
16 Check bearing bores in support for damage.
Smooth out scratches with crocus cloth. If
grinding damage is present, replace support.
Assemble Right Brake Support Assembly
17 Apply thread locking compound to threads of
pipe plug (8).
NOTE
On X200-4A, if tube (8) is damaged,
replace support assembly.
18 Using 3/16 inch hex plug end, install plug (8) in
support (2).
19 Using torque wrench and adapter, tighten plug
(8) to 5 lb ft (6-7 Nm).
20
Turn support over, inside up.
21
Using arbor press, install pin (3) in support (2).
Press pin to a height of 3.511-3.531 inches
(89.18-89.69 mm) above inner
surface
of
support.
22 Using arbor press, install two pins (4) in support
(2). Press pins to a height of 0.230-0.250 inch
(5.84-6.35 mm) from shoulder.
23
Turn support (2)over, outside up.
24
Using arbor press, install needle bearing (7) with
driver against numbered end of bearing case.
Press bearing to 0.060-0.070 inch (1.521.78
mm) below surface of support (2).
25 Using arbor press, install tube coupling (1)
grooved end out, into support (2). Press tube to
a height of 0.620-0.660 inch (15.75-16.76 mm)
above shoulder.
26 Apply lubricating oil and petrolatum to bearing
journals for races (5, 6) on support (2).
Go to Sheet 8
4-118 Change 2
Para.4-20, Task 4
|
|