TM 9-2520-272-34&P
4-21.
ASSEMBLE RIGHT END COVER ASSEMBLY
(SHEET 21 OF 22)
TASK 8. INSTALL RH OUTPUT FLANGE
COMMON TOOLS:
Adapter, 3/4 to 1/2 inch
Bar, pry
Crowfoot, 1/2 inch square drive, 2 inches
Extension, socket wrench, 1/2 inch square drive, 10
inch
Hammer, hand, ball penn
Handle, socket wrench, 1/2 inch square drive
Handle, socket wrench, 3/4 inch square drive
Punch, center, tapered
Socket, socket wrench, 1/2 inch square drive, 3/4
inch
Socket, socket wrench, 3/4 inch square drive, 1-7/8
inches
Wrench, combination, 1-7/8 inches
Wrench, torque, 0-175 ft-lb
Wrench, Combination 1-5/8 inches
REPAIR PARTS:
Packing, preformed (96906) MS28778-20
Washer, tab type (73342) 6752556
SUPPLIES:
Bolt, 1/2-20 x 3 inch (2 required)
Petrolatum (Item 14, Appendix C)
Rag, wiping (Item 15, Appendix C)
PRELIMINARY PROCEDURE: RH output shaft and seal
installed. Refer to this paragraph, TASK 1.
NOTE
Right end cover assembly turned outside up.
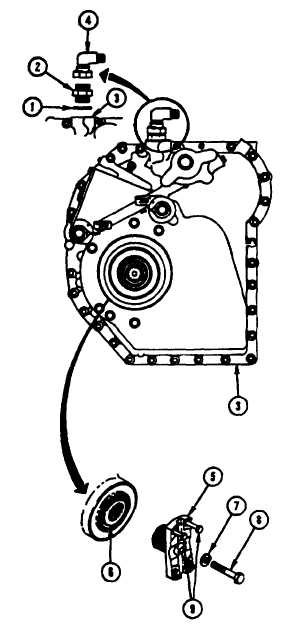
1
X200-4 Install new packing (1) onto elbow (adapter)
(2). Lubricate packing (1) with petrolatum.
2
X200-4 Using 1-7/8 inch socket, install elbow
(adapter) (2) into right end cover assembly (3).
3
X200-4 Using 3/4 to 1/2 inch adapter and torque
wrench, tighten elbow (adapter) (2) to 127 - 140 lb-ft
(172 - 190 Nm).
4
X200-4 Using combination wrench, install elbow (4)
into elbow (adapter) (2).
Go to Sheet 22
4-146 Change 2
Para. 4-21, Task 8
|
|


