TM 9--2815--247--34
0069 00--6
PISTONS, RINGS, AND ASSOCIATED PARTS REPAIR -- CONTINUED
0069 00
Inspection -- Continued
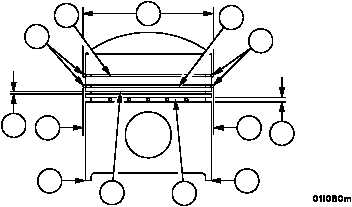
7. Check the top ring groove (5) and the second ring groove (6) by measuring over 0.11547 inch (2.93294 mm) dia.
pins (17). Replace pistons that do not meet the following limits (21 and 22).
8. Check the third ring groove (7) and the fourth ring groove (8) by measuring the inside width (18 and 19). Replace
pistons that do not meet the following limits.
9. Measure the piston diameter at the bottom of the skirt, 90 degrees to piston pin (20). Replace pistons that do not
meet the following limits.
REF
NO.
POINT OF MEASUREMENT
SIZES AND FITS OF NEW PARTS
inches (mm)
WEAR
LIMITS
21
Diameter of top keystone groove in piston
(measured over 0.11547 dia. pins):
standard
0.0100 (0.254) oversize
0.0200 (0.508) oversize
0.0300 (0.762) oversize
0.0400 (1.016) oversize
5.7300 (145.542)
5.7400 (145.796)
22
Diameter of second keystone groove in piston
(measured over 0.11547 dia. pins):
standard
0.0100 (0.254) oversize
0.0200 (0.508) oversize
0.0300 (0.762) oversize
0.0400 (1.016) oversize
5.7390 (145.7706)
5.7490 (146.0246)
18
Inside width of intermediate groove in piston
0.0960 (2.4384)
0.0970 (2.4638)
19
Inside width of oil control ring groove in piston
0.1880 (4.7752)
0.1890 (4.8.006)
20
Diameter at bottom of skirt 90 degrees to pis-
ton pin:
standard
0.0100 (0.254) oversize
0.0200 (0.508) oversize
0.0300 (0.762) oversize
0.0400 (1.016) oversize
5.7390 (145.7706)
5.7400 (145.796)
Figure 8
5
6
7
8
21
17
22
19
20
20
18
22
17
|
|


